Showing posts with label April Rhodes. Show all posts

Saturday, August 3, 2013

Allow Me To Brag...

People ask, "Aren't you amazed at April's recent accomplishments?" And I answer, "No." For one thing she has been working her ass off. Secondly, I honestly knew this girl would do beautifully creative things with style and I had a hunch it would be in the fashion industry. When she was little she would dress herself in little well-put-together outfits, comfortable but with a unique flair. One of my favorite ensembles was a pair of blue jeans that fit snug and cropped at the ankle put together with a blouse that that tied at the waist and black patten leather shoes (we called them clappy shoes because the sweet sound they make when walking on a hard floor). She was styling then as she is still. This is her just released second pattern, The Date Night Dress. Her good friend Daria is modeling below. This one is made from Anna Maria Horner's rayon (none left in the shoppe but I will reorder it on Monday).

 Daria is a stunning model.

The Date Night Dress pattern is available as a PDF but soon this will be April's second printed pattern. Nice going Girl. I am soooo proud of you and I am bragging to everyone!!

Thursday, June 27, 2013

The Staple Dress is coming...

Mary in the Staple dress by April Rhodes

We are just days away from having a printed pattern. How many days? I still don't know and I'm her mother!! I stopped asking April when we would get patterns weeks ago because of the added stress to her... she has been working with the printer for 2 months to get it just right for us. She has been working day and night while taking care of two very active girls. I know her girls are very busy because I watched them yesterday. I left the very innocent two year old, Camilla for just a moment and returned to find her with black permanent marker and one of my books. Later I saw that she left some "art work" on my linen pillow sham. I will adore the marks on my sham as it reminds me of darling Camilla.

But the pattern is coming... Stay tuned for the exact day. Do you follow us on Facebook or Instagram? You may get the news quicker if you do.

Lastly, I have to say how very proud I am of April. I've always known she had style. Now she gets to share that style with us through her patterns. Please send April loving thoughts as we wait out the last days until the patterns arrive in the mail. I pre-orded 100 to sell here at the shoppe. I know you'll want one.

See you soon,
Anita

ps... April is staying up into the wee hours working on two more patterns. I can't wait!

Wednesday, March 20, 2013

happy spring! sew a STAPLE!

What's a STAPLE?
It's a dress.

You know, the kind you want to wear everyday. The one that's your year round wardrobe essential.

Well I designed this one, and that's the way I feel about it.

It's THE STAPLE DRESS and it's available now!!
Just head over → HERE ← to get yours.


Also,  if you shoppe with us, we'll give you 10% OFF your fabric when you purchase this pattern!!

Happy Spring!!


*** photography by Suzanne Gipson ***

Sunday, December 2, 2012

My wrappings.

Today I posted over on my personal blog...
I adore both Melody and this book so much that I had to join in! I made three gift boxes and added my own scrappy little felt project... A Happy Geese Garland.

See how I made it and check out the full post here: http://aprilrhodes.blogspot.com/2012/12/my-wrappings.html


Continue to comment for the chance to win another copy of Ruby Star Wrapping plus a bundle of trims and such to help with your own packaging. We'll post the photo of those tomorrow, but trust me, you want them.


- - - - - - - - - - - - - - - - - - - - - - - - - - - - -
Left on the tour:

Tomorrow, Dec. 3rd - we'll post some of our projects here on the Sew To Speak blog plus show you what's up fpr the second win!!

Tues. Dec. 4th - Rae of Made by Rae

Wed. Dec 5 - Ericka of Low Beam Studios 

Thurs. Dec. 6 - Emily of The Boy Trifecta

then finally, on Friday  Dec. 7 - the final winner will be announced @12 EST!!

Monday, November 19, 2012

Hunny

If you visited us on "Suzy Day" then you had the chance to meet the 5ft tall-top-secret-doll. Suzy Ultman enlisted our help with for a very special project for Land of Nod's new popup shop in NYC.


This is Hunny.

WE were forced to be hush hush for a little while and couldn't post any of our photos of her until after the opening, but now we have the go ahead so here she is! Fun right?!

I blogged more about making Hunny + more photos over here.

Me, Hunny and Suzy :)

Oh and she made it into the video too!!!


The Land of Nod Toy Shop from The Land of Nod on Vimeo.

Saturday, August 25, 2012

Lions and Tigers

animal prints aren't just for the nursery ;)
I really like my new lions and tigers tank!! This fabric could make so many awesome things.. a dress, a skirt, an infinity scarf... it reads as an abstract print at first but then it has that quirky charm.. gotta love it!


Grrr....
Happy Saturday! 
;)
April

Friday, May 4, 2012

Everyday Skirt Part 2: Sewing the Skirt


A fun, full summer skirt.. for parties or parks... work or rec.. or just to keep you cool.
Everyday.


For this skirt you will need: 

A main print, mine is Alexander Henry's Metro Cite in Navy = to your desired skirt length below waistband plus 3" (1.5" for hem + waistband and 1.5" in case of shrinkage)  twice,

2" elastic = to your waist measurement plus 3-4 inches for shrinkage if you dye or prewash,

plus regular and elastic thread.

Note: It's a good idea to prewash fabric and elastic.


Prepare the elastic waistband. You can use white, black or try dyeing it, I dyed this one with Rit brand Pearl Grey (see Everyday Skirt Part 1: Dyeing Elastic). After dyeing, washing and drying cut your elastic 1" longer than your waist measurement. Finish each short end with a zig-zag or overlock stitch, backstitching at each end. Next fold waistband in half, matching the overlocked ends and sew together with a 1/2" seam allowance, backstitching at each end. Press this seam open.


Cut out two skirt panels. The length of the panel should be cut at the desired finished skirt length (have someone measure you, starting just below were you'd like you waistband to sit) plus 1.5". For a fuller skirt or for a larger waist measurement you can use the entire fabric width salvage to salvage twice. For my skirt I wanted it to be full but not overly full, so I cut off 5" from both panels, giving me two 40" wide panels. Each panel can be anywhere from 1 to 1.5 times your waist measurement. Customize it to your desired style and fit.


With right sides together, sew your two skirt panels down each side seam with 1/2" seam allowance. Finish the seam with either pinking, serging or zigzag stitch. Turn skirt right side out. 

Hand wind a bobbin with elastic thread, careful not to stretch the thread as you wind. Load bobbin into your machine.  Sew one row of straight stitches with a normal stitch length, 1/4" from the top of your skirt. With the elastic in your bobbin your skirt will start to gather (or shear). Continue all the way around and backstitch when you reach were you started. Sew another row at 1/2" seam allowance ending with a backstitch. Finally sew a zig zag or other overlock stitch at the very top edge of the skirt to keep it from fraying. 


The two rows of shearing should make your skirt top a lot closer to your waist size but maybe not quite, IF not switch back to regular thread in your bobbin and sew one row of basting stitches (4.0mm - 5.0mm long) in between your 2 rows of shearing, leaving the tails long for pulling.  I know this may seem like complete over kill with the shearing and the gathering but trust me it helps so much when it comes to trying to evenly space your gathers. The shearing spaces them perfectly for you then when you gather you have less to fuss with. When making my second skirt I tried skipping the 1/4" row of elastic shearing and in the end found it essential. 

IF you had to sew the gathering thread pull just your bobbin thread in a drawstring type motion until the top of your skirt fits into your waistband, spread the gathers evenly around your skrit. IF the shearing  stitches made your skirt gather enough or made the top of your skirt smaller then your waistband simply give it a little strech until it fits within the band. 

Find the sides of your waistband, fold it in half with the seam centered to the back of the skirt, mark the sides of the waistbands with pins or fabric marker.


Start pinning by aligning the side seams of your skirt with the marked sides of the band. The bottom of the elastic should just overlap the bottom row of shearing stitches, so you cannot see them. 

Pin well all the way around your waistband. 


Edge stitch (with regular thread in bobbin) along the bottom of the waistband with a stretch stitch or tiny zigzag. 


Finally try it on and determine your hem length.. I usually finish with a 1" hem, pressing the fabric up 1/2" twice and then edge stitching the top of the fold. For this skirt I want to squeeze out just a bit more length so I did a 1/2" hem, ironing up 1/4" twice.


Done!

Haha... It's even easier to make then it is to blog about.

Also it's true the skirt I originally showed you had pockets.. and so does this one though I left out photos of them.. and you may be wondering were the pocket part of this tutorial is... Well to be honest I was going to post it but this little ditty has already taken me long enough :( 
I'm sorry. 
(Everyday Skirt in Farmington Gate in Red)

Many of you could probably figure them out. But if you're local and you really want to learn the pockets, take my Everyday Skirt Class (with pockets!) at Sew To Speak and I'll teach you how!

Hope you enjoy and happy sewing!!
April


P.S. As for the time in between blog posts these days I feel I owe another apology.  It's funny how easy it is one week.. children calm, napping and sleeping on schedule.. predictable daily routines...sewing sewing sewing and than bam! No sewing or blogging for weeks.. I guess that's life with little ones... but alas I know they wont be little long... so I let the blog go and save the photos to be edited later... sucking up baby time until regular sleep schedules return and I can focus on my computer screen for a bit... 
Sometimes I just don't see how other working, crafting mama bloggers do it, if you have the secret key to this perplexing mystery, leave a comment!!!

Monday, April 4, 2011

Beautiful woman and gifts for Baby.

As many of you already know we are expecting another shoppe baby. Due very soon (ANY DAY NOW) is my second little girl, Camilla.
With both of my babies I've been so blessed by the wonderfully crafty and talented women in my life. Handmade gifts are the greatest!!

Just last week the ladies of the shoppe took me out to one of my favorite local restaurants for a before baby dinner. We sat and ate and shared stories about birth and they gave the most gorgeous gifts for baby!


Janelle, who arranged the whole evening, made a sweetly embroidered sack that held precious knit baby leg warms to warm her chubby baby legs this fall

Emily made the baby fun nesting baskets that the big sister is already trying to claim! She says the baby can carry the littlest ones and she'll carry the bigger two and they'll go shopping! :)

Sheila gave us those supper cute patchwork blocks, that Aelyn is also playing with, stacking up and knocking down. I can see my two girls having lots of fun with these... AV says she'll teach the baby how to build. 


And Mary made us the fox quilt I've longed for since seeing her first one that now hangs in the shoppe as a sample of the class she teaches.

Thank you all a million times over! If my emotion doesn't come through in this post please know that I cried when I got home and shared your creations with Jeff. You are truly beautiful woman.

My love to you all,
April

Monday, January 10, 2011

Made Monday

buck-3-010911
buck-2-010911

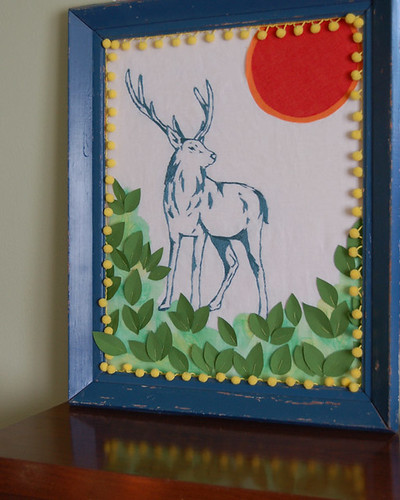
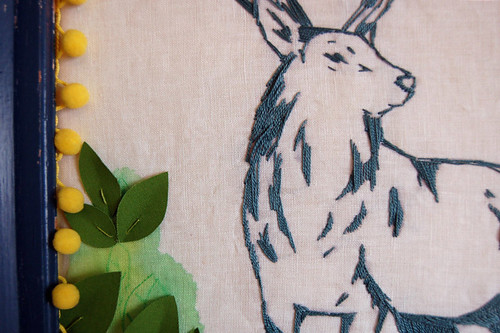
An embroidered Buck on white linen, accented with paint, fabric and pom poms. Made by me, April Rhodes. Inspired by the new line of Echino! 

Monday, November 29, 2010

April's Mini Matryoshkas


Little two and a half inch dolls, made to spread 
joy and cheer. 
These tiny girls love to be hung alongside the glowing lights of a tree or just carried in your pocket
strung amongst your keys. 
They're happy to be anywhere that they'll be smiled upon and praised. 
So sew some up for yourself and friends, and have 
Happy Holidays!


What you'll need
several colors of felt including skin toned felt for the doll's faces (I like to use 2 shades of the same color for the body of my dolls)
fabric marker or chalk pencil
pink (rosy) colored pencil
hand sewing and embroidery needles
applique pins - optional
fabric scissors (a small sharp pair helps greatly with the detailed cutting of little things)
paper scissors
clear, fast drying fabric glue like "Unique Stitch"
thread to match felt for doll body
black pearl cotton or floss
hair colored pearl cotton or floss
other bits of pearl cotton/floss to sew on flower embellishments
6 inches of complimentary yarn (or floss) for hanging
fiberfill/stuffing


How to make one:


First print and cut out all pattern pieces.


Choose the colors for your Matryoshka's hood, back and tummy. 


Next, you can either trace your pattern pieces onto the felt with a fabric marker or pencil, or you may opt to use itty bitty applique pins to pin the pieces down and cut around them. I use both methods depending on the pattern piece's shape and size.


Cut out you doll's face, hood, tummy and back of body. Be sure to mark where her hood overlaps her tummy piece.


Apply a tiny amount of glue around face and top edge of tummy. 

  Front view        -       Back view

Glue her face behind her hoods opening and then line hood up with the top of her tummy (along overlap line).


While the glue is drying choose and cut out your flower design. Feel free to play around and come up with your own flower and leaf combinations.

Click on photos for a larger view ;)

Attach your flower design to your doll's tummy. I use a single straight stitch to attach my leaves and either a french knot or cross stitch in the center of my flowers.


After the glue has dried, using a single strand of coordinating thread, take some small stitches around the base and opening of the hood, to secure your gals face and tummy.  


Next using a double strand of hair colored pearl cotton or floss, satin stitch her hair. Use the pattern as a guide for placement and stitch slightly under the hood as you go, so as to avoid any bald spots.


Now mark eyes, lashes and mouth placement and stitch with a single strand of black pearl cotton/floss. Use a twice wrapped french knot for the center of her eyes and straight stitches for her lashes and mouth. Draw on your doll's blushing cheeks with your pink colored pencil.  


On the back body piece, using a large needle, pass the 6" of yarn, knotted at the end, through center of felts loft and come up at the top of your dolls head, this will secure your dolls hanging loop, but you should not be able to see the stitch from the doll's back side (see photo bellow).

Wrong side/ inside doll    -     Right side/back of doll

Draw needle back through the center of the felt and out next to your original knot. It helps to hold the felt at the doll's head secure between two fingers as you do this, and you may need to reshape the felt a bit at the needles entry point. Knot the yarn an inch from the end, trim off excess and pull loop taut.  


Sandwich the two body pieces together.


Starting at the bottom right corner of your little lady's body, blanket stitch her front and back pieces together using a single strand of coordinating thread. Stop at the opposite corner, leaving the bottom open.


Stuff firmly. Use the end of your pencil to help push stuffing into her head and body.


Finish by closing her up with blanket stitch across the bottom.


Yay!! 
You've made a sweet little dolly to hang from your tree or anywhere that brings you joy.
Now make some more and give them to your friends. Everyone is sure to delight in their delicate cuteness!


Happy crafting! 
Lots of love, 
April