
Here is a spin on the traditional pinwheel block that may be fun for a try! Using just two solid colors white and Kona in Cheddar I worked out a great block with a bit of a nautical flair!
I began with 2 inch strips of Kona in Cheddar and white. Cut the strips from the width of the fabric - selvage to selvage. Using a 1/4 inch seam allowance, sew the strips together. I pieced mine Cheddar, White, Cheddar, White. Press seams in the direction of the darker fabric.


I began with 2 inch strips of Kona in Cheddar and white. Cut the strips from the width of the fabric - selvage to selvage. Using a 1/4 inch seam allowance, sew the strips together. I pieced mine Cheddar, White, Cheddar, White. Press seams in the direction of the darker fabric.

Sub-cut this fabric strip into 6 inch squares....I used a 6 inch square up ruler for perfect squares.

For a pinwheel we need another fabric to go in between and make our pinwheels spin!
So I cut White 6 inch squares....

Pinwheels are simply half square triangles arranged in a pinwheel pattern. Now, we are ready to make our half square triangles an easy way! On the White square draw a diagonal line from corner to corner...


Place a White square- right sides facing- on top of a pieced Cheddar square and pin parallel to the diagonal line {at least 1/4 inch away from the line}.
Now stitch 1/4 inch from the drawn diagonal line....on both sides of the diagonal line. Do not stitch on the diagonal line because this will be your cutting line.

Once you have stitched on both sides of the line, you can cut the two sides apart on the drawn diagonal line.

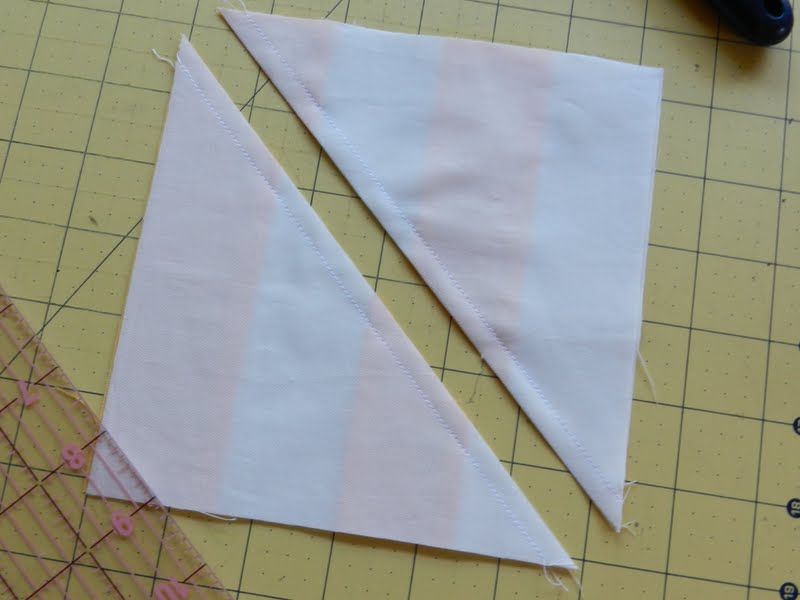
Open and press the seams toward the pieced fabric. Cut off the dog ears from your block after it is pressed.

It will take two sets of squares to make one complete pinwheel block. Arrange your half square triangles in a pinwheel pattern.

Now you will sew the top half together and the bottom half together {again, using a 1/4 inch seam allowance}. Press the seams toward the pieced fabric. Then sew the top and bottom half together.

If you arrange your pinwheel halves just so...you will end up with another mini-pinwheel in the center!

And you also get this fabulous secondary pattern where the two pinwheel blocks meet! LOVE a good secondary pattern!
This would make a fabulous quilt for you or for a new little one :) Or what about making enough of this 'fabric' to use in a tote pattern? You would be such a hit at your next picnic with a cute pinwheel tote!
Have fun!
Mary
11 comments:
How pretty! I LOVE pinwheels too! I was going to make a pinwheel quilt soon, and this is just the incentive I needed! Thanks Mary!
ok that looked a little too easy! I did a pinwheel quilt once and I must of taken the hard way. Thanks so much for a great and easy to follow tutorial. Cynthia
That is a nifty trick! Keep showing us these, and I might have to start quilting!
Love this! I can see it with multiple hues of Kona too... I am definitely going to try this!
Thank you very much, Mary! It' a great and simple tutorial,specially for me because I'm a beginner!
There are a lot of combination with colors or fabric!
I want to make a "nap" size quilt using this pattern. Does anyone know how much fabric I might need to buy and how many blocks that would need? I fell in love with this pattern, was searching on l on line and came across it.
This quilt will be for a fellow quilter who has cancer and I want it to cheer her up!
Hi Linda! I think if you want to make a "nap" size quilt, you may want to consider making it 4 blocks by 5 blocks. This would make the quilt about 48 X 60. Your fabric requirements will be 2.25 of the white fabric and .75 of the yellow fabric. However, I always buy a bit extra fabric for any project just in case I run short or make an error. Hope this helps!
I like the look of this quilt! I wonder how it would look with all the pinwheels pieces matching......
Are these in the end 12 inch blocks after all are sewn together ?
I need to make 16 12 inch blocks for a friendship quilt so will this work for that purpose
I love the nautical flair and secondary patterns in this spin on traditional blocks.
Post a Comment