Showing posts with label kids sewing. Show all posts

Monday, July 23, 2012

A foxy sort of day...

It started off with the post about Nigel and his awesome shirt... followed by my buying more of the white fox print for my own foxy garment and then finished by this little "Foxy Lady" craft with my girl Aelyn.


Aelyn turned five this past Saturday and today I set out to stitch something with her. She did quite well. She chose this fox from an older issue of Molly Makes that we have on our iPad. I printed it at 150% rather than the 200...and cut out all the paper pattern pieces for her. We pinned the pattern to the felt together. Then she cut around the paper while I helped hold it all steady. I cut the smaller pieces as they were much trickier. Than she wanted the foxes eyes to be blue and open rather than closed as theirs were and she also insisted upon limbs ;) which the original design was without. She first glued the little pieces to the face. I stitched the flower stem for her. She than stitched around the tail and body as I held it and help guide her along. She then stuffed it as I held and stitched it closed. We did it all in three sittings through out the course of the day and finished it just before bed time. Concluding with a photo shoot were she surprised me with her knowledge of depth of field. She sat the fox on one end of our dinning room table and went around to the other saying "take a picture with me here".... I said "I won't be able to see you very well back there" and she said "but I want to look small!"


Being that I studied a bit of photography way-back-when, I felt very proud at that moment. Proud of her thoughtfulness. Her composition. Her stitching. Her craftiness. And her adorable smile! (My only wish is that I'd gotten my real camera out instead of being silly and using my hipstamatic... but perhaps she'll let me take another photo tomorrow with the window open and the sunlight...)
Tonight she sleeps with her new friend.

Foxy Five and Fun!

G'nite foxes!
April

Thursday, March 18, 2010

Spring Classes At Sew To Speak

I updated our classes page yesterday and just wanted to let you know!
Some new descriptions and new calendars for April and May have been added!


We have some NEW classes, like The Collette Dress, Beginner's Messenger Bag, Cog and Wheel Quilt... 
and many more dates for our classic classes, the ones that people just can't seem to get enough of, like Intro To Machine Sewing, Beginner's Tote Bag, Barcelona Skirt, and Personal Fit. You can also expect even more new and classic classes to be offered this summer, including some great things for kids/teens.


Our classes have really taken off and we are so pleased at the response we've gotten. We've even had to start wait lists for many... so if there is one you are particularly interested in we urge you to call right away.

A big thanks to all our lovely, dedicated teachers.
Michelle, Pat, Heather, Sheila, Mary and April (yay, thats me). Thank you all for sharing your love of sewing!  :)

And finally, if you've taken a class and you feel moved to comment, please do! I'm sure our teachers would love to hear your feedback and how you're using what you've learned.

Have a great Thursday.
April

Tuesday, September 1, 2009

Customer Showcase: Sarah!


A few months ago, Sarah came in to our shoppe with her mother Lisa and younger sister Hannah. They were looking for materials for her 4-H sewing project. Sarah chose a great black and white print by Alexander Henry, perfectly suited for the jacket pattern she wanted to make.

Just this past week, much to our delight, we received an e-mail from Lisa. In it she attached this great photo of Sarah modeling her completed project. She also told us that the lovely young lady, age 15, won an Outstanding of the Day at the the Ohio State Fair as well as the Fayette County Fair.

Good job Sarah!!!
Keep up the great sewing!


This is the first of many....
We have often said how we love seeing what all our customers create as well as hearing about their shopping experiences and sewing stories. Now, we have decided to randomly showcase (monthly or perhaps even more often) the customers and stories that we feel must be shared with the masses.
You too can share with us, via flickr, e-mail or comment (you could even send us a link to a specific blog post you've writen).

Tuesday, August 4, 2009

Petite Pack

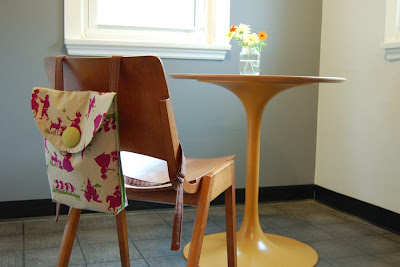
As we enter August plans for going back to school come to mind. You may want to stay in denial about summer ending but regardless, the wee ones will load up their book bags and march off to get smarter. On a brighter note you may have more time to sew while they're getting educated. Certainly you'll have plenty of time to sew up one of these cute, super simple, mini backpacks.
I designed it with an early elementary aged child in mind. Perhaps a darling little first grader. One who doesn't need to carry much but still cares about looking cute :)
However, I can totally see a young teen coming home only to toss down her heavy book bag, pickup this little pack and run back out the door to some after school engagement.


Here's what you'll need:
  • 1/2 yard fabric for exterior*
  • 1/2 yard fabric for contrasting lining
  • 1/4 yard fabric for straps
  • 1/4 yard decorative ribbon optional (for top of pocket)
*(unless print is directional, then you'll need 1 yard)
  • 1/2 yard "Pellon" decor bond
  • 1/4 yard lightweight interfacing
  • one full sheet of newspaper
  • fabric shears
  • and paper scissors
  • 2" bias tape maker
  • masking tape
  • measuring tape or yard stick
  • and large acrylic grid ruler
  • fabric marker or chalk
  • large snap, Velcro, button or other closure
*You can click on any photo or illustration to see enlarge.*

Here's how it's made:
Step 1
Making the pattern

Taking your full sheet of newsprint and cut straight down center fold. Then laying one sheet flat, lay second sheet on top, overlapping at the horizontal fold line, measure to ensure you have one long strip of newspaper, 33" long by 11" wide. Tape together. Now fold this new piece in half longways and draw (freehand or trace, using a large dinner plate) a quarter circle starting from top corner of folded edge and rounding down to about 5" bellow top corner of opposite edge. Cut along line. Unfold. You should have a 33" x 11" piece of newspaper with a rounded top. This is your pattern.


Step 2
Cut

Using the pattern you've just made cut 1 from exterior, one from lining and one from decor bond. IMPORTANT : If your fabric has a directional pattern you will need to take special care to ensure print is right side up on exterior front of bag. To do this lay your exterior fabric face up and pin pattern to fabric as illustrated (right).
Iron "decor bond" to wrong side of lining fabric.


Next you will need to cut your straps, to be made with a 2" bias tape maker, however you will NOT cut these on the bias. I cut my strips 3 3/4" wide x 45" long (entire length of fabric). Do this with both strap fabric and lightweight interfacing. Iron interfacing strips onto wrong side of fabric strips.

Step 3
Make Straps

Using your two long strips with interfacing ironed on, follow instructions to make 2" tape (it helps to cut end of strip to a point in order to feed through tape maker easily). Be sure interfaced side is facing up as it passes through tape maker. Cut off pointed tip of both strips and compare both lengths of tape to make certain they are the same length (about 42"). Unfold one short end, fold under 1/2", press, refold and press, repeat with all short ends. Now fold tape in half longways and press (the finished strap will be 1" wide). Edgestitch down one long side, across short end, down opposite side and across to meet where you started. Backstitching at start & end.

Step 4
Attach Straps to Exterior

Lay exterior piece face down on your ironing board. Fold bottom (straight end) up 13", and press. Fold top (rounded end) down over bottom, about 7", press. Now flip this (to what will be the back of bag). NOTE: If your print is directional it will be upside down on the backside of the bag. With a fabric chalk or disappearing fabric marker, draw an 8" line, starting 1/2" down from top fold and 2" in from left side. Repeat 2" from right side. These lines will be the guides for your strap placement.
Unfold bag exterior completely and lay flat, right side up (rounded end at top). Now take bag straps and fold in half, press or mark with chalk. Line this mark up with top of line on exterior, pin straps in place with outer edge of straps against guide lines (2" from bags edge). Chalk a line across strap where guide line begins and ends. Sew straps in place following existing edgestitching and crossing at marked lines (as shown below [click photo to enlarge]). Backstitch at beginning and end.
Step 5
Attach interior Pocket

Oh yeah! I forgot to have you cut a pocket in the cutting step. Well I guess you'll have to cut it now. First determine the size of pocket you'd like. I cut out a 6" x 8" rectangle and the result is a pocket about 7inches wide by 5 1/4" deep. Pocket option A: if using a decorative ribbon as I did, fold top edge down 1/2" to right side, press. Pin ribbon across front covering raw edge. Topstitch across top and bottom of ribbon. Pocket option B: if NOT using ribbon, simply fold top of pocket down 1/4" to wrong side, press, fold down again another 1/4" and press, edgestitch across.
Now lay pocket face down on ironing board and fold bottom edge up 1/4", press. Then fold sides in 1/4" and press. Place pocket onto lining piece, about 8" down from tip of rounded edge, center and pin in place. Topstitch around the 3 sides, backstitching at beginning and end.

Step 6
Assemble Bag

Start with exterior piece laying face up with straps folded down over themselves. Lay lining face down on top of exterior and pin together, starting at tip of rounded top and pining down both long sides. Leave straight, short bottom unpinned. Sew around sides where pinned with a 1/4" seamallowance.
Turn bag right side out. Placing your hand inside, run your finger or a turning tool along seam, especially at rounded top, then press nice and flat.
Take open end and turn raw edges in 1/2", press flat and edgestitch across. back stitch at beginning and end.
Lay bag flat with lining face up. Fold bottom edge up 12 1/2", press flat and pin along sides. Sew along sides from top to folded bottom, backstitching well at both beginning and end.


After these sides have been sew, do your best to press these seams open to show off the lining fabric. My trick for this is to first fingerpress and then wearing a potholder on my left hand (or which ever is your non-dominant), I slide it inside of the bag and press seams open this way while holding it. You could also use an ironing sleeve board if you have one.
Next turn bag inside out (use a chopstick or end of a clean craft brush to press corners out neatly). Flatten corner as pictured bellow. Place your hand inside and check to make sure seam is open and flat. Press corner flat. Measure in one inch from tip and mark, draw a line across corner perpendicular to seam line. Top and bottom of line sure measure about 1 1/2" from tip. Pin to keep flat. Stitch where marked. Be sure to backstitch well. Repeat with opposite corner.
Do not cut off corners, they will help bag bottom to keep it's shape. Turn right side out. Now with a potholder covered hand inside bag, press bottom flat.
Step 7
Finishing

To finish straps: Take one strap coming from top of bag and string two D rings onto the end. Fold end 2" up over rings, pin. Draw a line across the strap 1" down from top edgestitch, then draw a line from corner to corner to create an X. Stitch as marked. Repeat with both straps. Next feed bottom straps up through both D rings and then back down through bottom ring. Adjust straps to fit wearer.
Finally attach a closure of your choice. For example: a large snap, Velcro, button or other. When choosing a closure keep in mind your intended user. For a young child Velcro may be easiest for them to open and close on their own. If your little one is anything like mine they'll surely want to do it by them selves.
After your closure is secure you're ready to hand off the bag. Now watch as your little friend loads it up with treasures... or perhaps you'll load it yourself and watch as they unpack the surprises.. or maybe you'll be carrying it yourself :) . . . .
Whatever it is you do now, ENJOY.
April*


*I'd really love to hear any feedback you might have on this project/tutorial.
Also, if you make this "Petite Pack" we'd love to have you share it with us on flickr. Thanks.

Wednesday, May 6, 2009

Just a taste.

Fabrics ala Moda.

Moda is the newest addition to our ever expanding group of fabric suppliers. It was only a few weeks ago that we met with their charming salesman, Mark, placed our first order and Wow! several of the items are already here.

Most of the prints we've received so far are wonderfully classic with a bit of retro kitchen fun. Many of the fabrics from this grouping are 54" wide and perfectly suited for funky table linens or other home decor.
Though its a bit too late for Cinco de Mayo now... these Mexican cowboys and fun fiesta print would make great tablecloths for a summery gathering. Mmmm... I'm suddenly craving homemade tacos, fresh tomatoes and my dad's amazing salsa, loaded with cilantro picked straight for his back yard.


Oh and of course mom and I could not resist these adorably packaged "Learn to Sew" kits. Within their precious tin boxes the two kits include coordinating, quality fabric and supplies for your young sewer to embark on their first simple project.

And last but definitely not least, something for the pups! These perfectly paired prints would make up a super cute doggy bed, don't you think?


I have to admit that I'm more of a cat person (please don't hate) though I seriously cannot resist Scottish Terriers and miniature Schnauzers, honestly who couldn't? their cuteness is ridiculous!!