Showing posts with label tutorial. Show all posts

Monday, August 1, 2011

Made Monday


The Handmade Homemaker, Krista Shaffer shared these awesome kicks with us via Facebook
And she even did a tutorial over on her blog, check it out!

Thursday, July 14, 2011

Critters In the Cabin

I have had a great time this week working with our preview selection of Suzy Ultman's fabric Critter Community.  So I thought I would share an easy way to add a little kick to the log cabin block by setting it on point!


Begin by choosing a fabric for the center of your log cabin.  I choose a cute little hedgehog cut into a 2.5 inch square.  To the top of the square I added a strip of fabric using a 1/4 inch seam allowance {my fabric strips are random widths from 1.5 inches to about 2.5 inches}.


For my log cabin block, I am working counter clockwise adding strips to frame the center square.  So the next strip will be stitched to the left side of the center.....

           
Each time I add a strip, I simply trim it even with the edges of the square before adding the next strip.  It is a good idea to press each fabric before adding the next.


For this project I will use a 10.5 inch square up ruler to make the final cut on my block.  And since my block will be on point I need to over size the block.  So I simply continue adding strips until my log cabin is more than large enough for my square up ruler.  If you don't have a square up ruler you can use a piece of paper, posterboard or quilter's template plastic cut to the correct size.  Then place your acrylic ruler on top of your template and even with the edge - and cut!

   
I have placed my square up ruler on point.  Now I can trim around each side and the result will be a log cabin block set on point!  If you would like to make this even more fun, tilt the ruler a little and your block will be a bit wonky!


Easy and fun!


Happy Sewing!
mary    


P.S. Stay tuned for more projects using Suzy Ultman's new Critter Community and the fabric release date to come soon!

Friday, April 8, 2011

Springy Stash Buster


Sewn or not.. pennants are a super simple and springy stash buster. Inspired by a lovely customer and fellow blogger, Erin, I first made this small one for our front window and then set out to make another for above the fireplace. They go together quickly and are just so cheerful that I really want to sew some more! I think it'd be fun to string them around Aelyn's bunk bed, above the kitchen sink or across the front porch...  I wonder how many I could complete before the baby comes??

For more bunting/pennant inspiration and tutorials check out these blogs:

Bloom - No-Sew Pennant Banner Tutorial

Joyful Abode - how to make a Bunting

The Mother Huddle - No sew bunting using vintage handkerchiefs


Thursday, March 3, 2011

Afternoon Tea with Suzy

It's always nice when two to-does can be accomplished at once!

A brief excerpt from my seemingly endless to do list =

To elaborate, two of the things I HAD to do this week were:
1. Introduce the adorable creations of Suzy Ultman, our next guest designer and announce her visit to the shoppe, coming up Saturday, March 12th.
2. Make an anniversary gift for a coffee loving couple, my brother-in-law and his wife.

So in the spirit of killing two birds with one stone, I've set out to check off these two to-does, with this one blog post!

First of all let me just start by telling you how adorable Suzy Ultman's fabrics, papers, softies and illustrations are! Her work is very popular in the paper and craft industry. In fact you may have seen it without even realizing it. Her creations have been published by Chronicle Books and her list of clients rang from Crate & Barrel to Oopsy Daisy and many more.


All 5 images above of Suzy Ultman's work are from http://www.lillarogers.com/artists/suzy-ultman.

Her first two fabric lines for Robert Kaufman are just the tip of the brilliant iceberg which is Suzy's portfolio. She is certainly one to keep an eye on, and I personally can't wait to see what her next fabric line brings!

Suzy Ultman will be at our shoppe Saturday, March 12th  from 2-4PM, for an afternoon visit and trunk show. She'll be bringing samples of her precious work, some great giveaways and a sneak preview of her upcoming fabric line.

Now for my second  and the reason I can so perfectly combine these two tasks.
Suzy's current fabrics for Kaufman's Metro Cafe collection are all about coffee and there is certainly nothing better suited for my coffee obsessed relatives than these!


Suzy Ultman Tea Towels


For these fun and simple Suzy Ultman Tea Towels I used Robert Kaufman's Essex cotton linen blend, a 45% cotton and 55% linen cloth base and embellished them with raw edge appliqués, stitching and ruffles. The end result is a sweet set of unique towels that I really hope my relatives enjoy.


To make 2 towels you need:

2/3 yard of a cotton/linen cloth, toweling, woven, or twill
1/4 yard of Suzanne Ultman's Espresso Beans
1/4 yard of her Retro Mugs
and 1/4 yard of her Retro Perk
plus 1/4 yard "Wonder Under"
cream and brown thread
and a fabric marker or pencil

Prewash all fabrics (gentle cycle will help prevent fraying).

I made my towels one at a time so I have also written these instructions in the same manner, but for a set of two towels simple follow all instructions 2 times :)

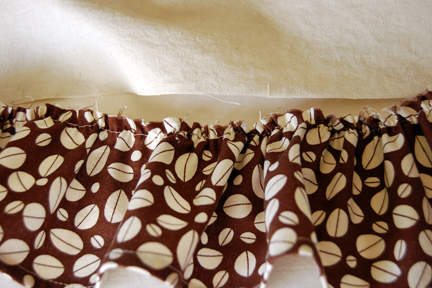
First cut your main fabric (toweling or other) to be 19"x24". Next cut the Espresso Bean print to 36"x4", this will be the bottom ruffle of the towel.


Finish one 36" side of the Bean fabric by ironing down 1/2", reopen, fold raw edge into crease line then refold and iron flat, creating a 1/4" hem, edge-stitch, backstitching at beginning and end. This is now the bottom of the ruffle.


Next sew a gathering stitch along the top edge at 1/4" seam allowance.
Pull bobbin threads and gather until ruffle is 19 inches long.


Attach ruffle to towel with a french seam: Pin ruffle WRONG sides facing to towel material, sew with 1/4" seam allowance, trim to 1/8", iron seam allowance up and then fold ruffle over so that right sides are now facing, pin and sew, backstitching at beginning and end.


Iron ruffle down and seam allowance up toward toweling. Topstitch towel 1/4" above ruffle to keep seam allowance flat, backstitch at beginning and end. Then finish sides of towel the same way as ruffle botton; iron 1/2" to wrong side, unfold, fold raw edge into crease line then refold and iron flat, creating a 1/4" hem, edge-stitch hem in place, backstitching at beginning and end. Hem top of towel the same way.

Now for the fun part!


Cut your Wonder Under to the size of one or more mugs and iron to the wrong side of the Retro Mug fabric. Cut out mugs leaving about 1/16"-1/8" of white all around. Do the same for one or more of the Perkalators.

Play with your appliqué layout. Make some small markings were your mug and coffee pot will go, set them aside, then stitch freely back and forth in brown thread to create a faux bois like surface to rest your mugs on. Next remove the paper backing from your Wonder Undered mug and pot appliqués and replace them on towel, iron to glue in place and finish by stitching around each appliqué 2-3 times.


Voila!
Now have a cup of coffee and enjoy, or wrap them them up with a bag of good beans and gift them to someone who loves their joe.

Tuesday, April 27, 2010

How To: Attach Bias Tape (with mitered corners)


Bias tape, also referred to as bias binding, has many practical applications. It is often used in garment sewing, finishing the arm holes of a dress, encasing the top edge of a pocket or bottom edge of a hem. It's also used frequently in home decor and accessory sewing to add the finishing touch to a project, such as a blanket or bag. It is very simple to apply and has a nice, clean finished look. Plus when you use a contrasting tape it becomes a fun design element.

Bias binding is also easy to make yourself so you are not limited to the pre-made, packaged tapes... virtually any cloth will do (though I suggest starting with a standard cotton weight until you are comfortable with the process). Clover tape makers are my preferred tool. They come in many sizes and the directions to make your own are easy to follow. Colette Patterns have also written a great how to make bias tape tutorial, here. When you make your own the binding the possibilities are endless; tiny flowers, polka dots, pinstripes, gingham and any color of kona cotton or a chambray. Have fun.


Here we go...


First completely unfold you bias tape. Here I am using tape I made using a 1" tape maker (ending up with a 1/2" wide binding) in a blue chambray.
Pre-made bias tape and tape made with some bias tape makers (such as Clover brand) will have one side narrower than the other. Visible when first unfolded.


Beginning with the narrower side, align the raw edge of your tape with the raw edge of your project, right sides facing. Fold the short end of your tape down at a 90 degree angle to meet the raw edges (shown above) and start sewing, backstitch.


Sew until you come to about seam-allowance distance away from the corner of your project (in my case 1/4") and backstitch.


Take your project out from under your presser foot, fold your bias tape up and to the right forming a 90 degree angle. Neatly finger press.


Then fold your tape straight out to the left along the raw edge of your base fabric. Pin in place.


Start sewing again along this second edge, seam allowance distance (1/4") in from the corner, backstitch. Note: Don't worry about the 1/4" unstitched portions around the corners. They will be taken care of in the final steps.


Continue around your entire project. When you get to where you started, continue to overlap your tape and sew about 2"- 3" past your starting point, backstitch. Cut off any extra tape.


Refold your bias tape: Flip your project over and refold your tape, encasing all raw edges.


When completely folded your tape should just barley cover your original stitch line. This is the reason for your bias tape having one folded edge slightly narrower and one thicker.
If you have a bias tape maker that does not create one side narrower then the other, you simply need to fold your tape slightly off (not quite in half) and attach the smaller side of your tape first.


Pin your tape neatly as you check to be sure all stitches are hidden underneath.
I like to use extra long flathead pins for this... the longer the pin the less pinning, plus they're cute! Also take care to tuck all corners into a tidy miter as pictured above.


The little boat print here is from Kokka's Trefle Collection (edited)

Finally topstitch, about an 1/8" from the inner edge of your tape, the entire way around your project, backstitching when your stitches meet. Voilà!

Note: You could also finish your bias binding by hand stitching the folded edge to the back of your project. This is a nice option when you don't wish to see any topstitching.

Friday, November 6, 2009

A Turtle and his Grassland


We just received these precious new mini patterns from Heather Bailey and as soon as I saw them I knew I had to make one.

I've decided to call him Carl.

I originally set out to make a girl turtle, complete with corsage, but when I finished the body and set the shell on top, I knew it was a gentleman turtle I had made. So now I'll have to make Carl a lady friend to keep him company. Then she can sport the pretty corsage on her girly tortoise shell.

As far as using Carl as a pin cushion... I just couldn't bring myself to stick him. I believe that if he could talk, he'd tell me that he much rather be a toddler's toy.
For extra kicks I whipped up this little grassland habitat so that Aelyn could set out with her new turtle friend, graze and explore. Yes, it's silly and a perhaps a bit pointless but for a 5 minute project I think it's sorta humorous and whimsical. Plus Aelyn thinks it's fun.

A few tips if you set out to make a turtle too: Cut all pieces as precisely as possible. I prefer to iron my interfacing onto the wrong side of my fabrics before cutting. This cuts down on time and eliminates any discrepancies between your fabric and interfacing pieces. Also, be certain to transfer all pattern markings, dark and precise.
As for the stuffing, a chopstick helped but for the next one I intend get one of these "Stuffing Forks" she refers to. I have a feeling it will make the job much easier.
Finally, as a famous tortoise might say... slow and steady wins the race!


To Make a Grassland

You'll need:
one 12"x 18" piece or two 12"x9" pieces of green felt
matching thread
scissors
sewing machine (you could also hand-sew)
and a dry iron

First cut the large piece of felt in half so that you have two 12x9 inch pieces.

One of these will be the base of the grass land.
From the other you will free hand cut the grass. I saved some of my larger triangular clippings to use as free standing grass blades. Cut your grass any way you like. Note: it stands best if it is no taller than 3" tall. Also for stability, try not to cut past the bottom inch.

After cutting all your grass play around with the layout. Keep in mind your grass will be about 1/4" shorter and standup relatively straight.

Once you have all your blades where you want then, flip over and pin.

Sew to base using a 1/4" seam allowance. Trim all threads.


Using a dry iron, lightly press blades upward from base.

If grass flops over, it may be too heavy. Try trimming it down and finessing it upward a bit. This should help it stand for you (the grass will naturally be a little floppy but shouldn't flop completely over).


Finally introduce your herbivore to it's new home!


Have a happy weekend.

'Til next time,
April

Friday, October 30, 2009

How To: Sew a French Seam

I love French Seams!
They are quick, simple and clean. Especially nice for kids clothes that need to endure lots of wash cycles. This is a perfect technique to use when working with fabrics that tend to fray heavily or if you just want a professional, polished finish without a serger or overlock stitch. With a French Seam all raw edges are completely enclosed. No unraveling.

The technique may at first feel counter intuitive but once you've seen it (or sewn it) you'll see it's quite simple and makes perfect sense. There is only a bit of extra math involved in order to determine your finished seam allowance. I will explain how to sew a French Seam if your pattern includes either a 1/2 or 5/8 seam allowance (SA).


If 1/2" SA included - First with WRONG sides facing sew a 1/4" seam.
5/8" SA included - First with WRONG sides facing sew a 3/8" seam.


Next carefully trim seam allowance to 1/8".
Open pieces so that right sides and seam are laying face up, press seam allowance neatly to one side.

Turn again so that RIGHT sides are now facing, press.

Stitch 1/4" from the edge. Finally turn right sides out and voila! You have a completely encased French Seam.